カスタム ワークフロー アクション

HubSpotのワークフローツールを使用してビジネスプロセスを自動化すれば、チームの効率向上を図ることができます。カスタム ワークフロー アクションを作成すると、貴社のサービスとHubSpotワークフローを連携させることができます。

カスタムアクションを設定すると、ユーザーがアプリケーションをインストールする際に、そのカスタムアクションをワークフローに追加できます。

このワークフローが実行されると、設定済みのURLにHTTPSリクエストが送信され、設定したペイロードが提供されます。カスタムアクションに対するリクエストには、「X-HubSpot-Signature」のv2バージョンが使用されます。HubSpotからのリクエストを検証する方法をご確認ください。

以下のセクションまでスキップすることもできます。

始める前に

https://api.hubspot.com/automation/v4/actions/{appId}?hapikey={developer_API_key}

カスタムアクションの定義

カスタム ワークフロー アクションを作成するには、以下のフィールドを使用してアクションを定義する必要があります。アクションの定義では、HubSpotから送信されるリクエストの形式と、サービスから返されるレスポンスの処理も指定します。

  • actionUrl:アクションを実行する際のHTTPSリクエストの送信先URL。リクエスト本文には、どのユーザーに代わってアクションが実行されているか、入力フィールドにどのような値が入力されているかに関する情報が格納されます。
  • objectTypes:アクションで処理できるCRMオブジェクト。
  • published:既定では、カスタムアクションは未公開の状態で作成されます。未公開のアクションは、HubSpotアプリケーションに関連付けられている開発者ポータルにのみ表示されます。カスタムアクションをユーザーに対して表示するには、アクション定義のpublishedフラグを更新してtrueにします。
  • inputFields:アクションに渡す入力。これらのフィールドの値は、ユーザーによって入力されます。
  • inputFieldDependencies他のフィールドが特定の条件を満たすまでフィールドがグレーアウトされるようにするためのルール。
  • outputFields:アクションによって出力する値。この値は、ワークフローの後続のアクションで使用できます。カスタムアクションの出力はゼロにすることも、1つまたは複数にすることもできます。
  • objectRequestOptionsactionUrlへのペイロードに含まれる、登録されたオブジェクトのプロパティー。
  • labels:アクションのフィールドが表す内容とそのアクションの動作をユーザーに説明するための記述。英語のラベルは必須ですが、次のどの対応言語のラベルも併せて指定できます:フランス語(fr)、ドイツ語(de)、日本語(ja)、スペイン語(es)、ブラジルポルトガル語(pt-br)、オランダ語(nl)。
  • executionRules:ワークフローを作成するユーザーに対し、貴社のサービスからのエラーを示すために指定できる定義のリスト。
  • functions送信されるペイロードをURLに変換したり、URLから返されるレスポンスを変換したりするために実行するコードスニペット。

カスタムアクションの定義の例

// { "actionUrl":"https://webhook.site/94d09471-6f4c-4a7f-bae2-c9a585dd41e0", "objectTypes":[ "CONTACT" ], "inputFields":[ { "typeDefinition":{ "name":"staticInput", "type":"string", "fieldType":"text" }, "supportedValueTypes":[ "STATIC_VALUE" ], "isRequired":true }, { "typeDefinition":{ "name":"objectInput", "type":"string", "fieldType":"text" }, "supportedValueTypes":[ "OBJECT_PROPERTY" ], "isRequired":true }, { "typeDefinition":{ "name":"optionsInput", "type":"enumeration", "fieldType":"select", "optionsUrl":"https://webhook.site/94d09471-6f4c-4a7f-bae2-c9a585dd41e0" }, "supportedValueTypes":[ "STATIC_VALUE" ] } ], "inputFieldDependencies":[ { "dependencyType":"SINGLE_FIELD", "dependentFieldNames":[ "objectInput" ], "controllingFieldName":"staticInput" } ], "outputFields":[ { "typeDefinition":{ "name":"myOutput", "type":"string", "fieldType":"text" }, "supportedValueTypes":[ "STATIC_VALUE" ] } ], "objectRequestOptions":{ "properties":[ "email" ] }, "labels":{ "en":{ "inputFieldLabels":{ "staticInput":"Static Input", "objectInput":"Object Property Input", "optionsInput":"External Options Input" }, "actionName":"My Extension", "actionDescription":"My Extension Description", "appDisplayName":"My App Display Name", "actionCardContent":"My Action Card Content" } }, "functions":[ { "functionType":"POST_ACTION_EXECUTION", "functionSource":"exports.main = (event, callback) => {\r\n callback({\r\n outputFields: {\r\n myOutput: \"example output value\"\r\n }\r\n });\r\n}" }, { "functionType":"POST_FETCH_OPTIONS", "functionSource":"exports.main = (event, callback) => {\r\n callback({\r\n \"options\": [{\r\n \"label\": \"Big Widget\",\r\n \"description\": \"Big Widget\",\r\n \"value\": \"10\"\r\n },\r\n {\r\n \"label\": \"Small Widget\",\r\n \"description\": \"Small Widget\",\r\n \"value\": \"1\"\r\n }\r\n ]\r\n });\r\n}" } ] }

上記の定義により、ワークフローツールでは、出力が次のように表示されます。


カスタム ワークフロー アクションで行われる呼び出しには、次の2種類があります。

  • フィールド オプション フェッチ:ユーザーがフィールドを設定する際に有効なオプションのリストを取得します。フィールド オプション フェッチを使用して外部データフィールドをフェッチ(取得)する方法の詳細をご確認ください。 
  • アクション実行リクエスト:カスタムアクションを含むワークフローによってアクションが実行されると、このリクエストが送信されます。 

関数

関数は、APIへの送信前にペイロードを修正するために使用されるコードのスニペットです。また、APIから返された結果を解析するためにも関数を使用できます。HubSpotの関数には、AWS Lambdaが利用されています。以下のコードでは、次の要素が使われています。

  • eventは、関数に渡されるデータを格納します。 
  • exports.mainは、関数が実行されるときに呼び出されるメソッドです。 
  • callback関数は、結果を返すために使用できます。

このコードは、次の形式になります。

exports.main = (event, callback) => { callback({ "data": { "field": "email", "phone": "1234567890" } }); }

関数を設定する際、functionSourceの形式は文字列になります。コード内の文字はエスケープされるようにしてください。

一般に、関数の定義は次の形式になります。 

// { "functionType":"PRE_ACTION_EXECUTION", "functionSource":"exports.main = (event, callback) => {\r\n callback({\r\n \"data\": {\r\n \"field\": \"email\",\r\n \"phone\": \"1234567890\" \r\n }\r\n });\r\n" }

関数の例

以下の例で、入力コード、使用される関数、生成される出力を確認してください。  

関数への入力: 

// { "callbackId": "ap-102670506-56777914962-11-0", "origin": { "portalId": 102670506, "actionDefinitionId": 10860211, "actionDefinitionVersion": 1, "extensionDefinitionId": 10860211, "extensionDefinitionVersionId": 1 }, "context": { "source": "WORKFLOWS", "workflowId": 192814114 }, "object": { "objectId": 614, "objectType": "CONTACT" }, "inputFields": { "widgetOwner": "10887165", "widgetName": "My Widget Name" } }

使用される関数: 

// exports.main = (event, callback) => { callback({ "data": { "myObjectId": event["object"]["objectId"], "myField": event["inputFields"]["widgetName"] } }); }

想定される出力:

// { "data":{ "myObjectId":614, "myField":"My Widget Name" } }

入力フィールド

入力フィールドの定義は、以下の形式に従います。

  • name入力フィールドの内部名。フィールドのラベルとは異なります。UIに表示されるラベルは、カスタムアクション定義のlabelsセクション使用して定義する必要があります。
  • type:入力に必要な値の型。
  • fieldType:入力フィールドをUIでレンダリングする方法。入力フィールドは、CRMプロパティーと同様にレンダリングされます。有効なtypefieldTypeの組み合わせについて詳細をご確認ください。
  • supportedValueTypesに有効な値は2つあります。
    • OBJECT_PROPERTYユーザーが登録されたオブジェクトからプロパティーを選択するか、フィールドの値として使用する、先行アクションによる出力を選択できます。
    • STATIC_VALUE上記以外の場合は常にこの値を使用します。これは、ユーザー自身が値を入力する必要があることを意味します。 
  • isRequiredユーザーが入力フィールドの値を入力することが必須かどうかを指定します。

入力フィールドの定義は、次の形式になります。 

// { "typeDefinition":{ "name":"staticInput", "type":"string", "fieldType":"text" }, "supportedValueTypes":[ "STATIC_VALUE" ], "isRequired":true }

ユーザーに選択してもらうオプションをハードコードすることもできます。 

// { "typeDefinition":{ "name":"widgetColor", "type":"enumeration", "fieldType":"select", "options":[ { "value":"red", "label":"Red" }, { "value":"blue", "label":"Blue" }, { "value":"green", "label":"Green" } ] }, "supportedValueTypes":[ "STATIC_VALUE" ] }

外部データの使用

フィールドオプションをハードコードする代わりに、外部データフィールドを使用して外部データをフェッチすることもできます。例えば、ミーティング計画のリストや、提供する製品のリストを入力として取得できます。この場合の入力フィールドは、次の形式になります。 

// { "typeDefinition":{ "name":"optionsInput", "type":"enumeration", "fieldType":"select", "optionsUrl":"https://your-url-here.com" }, "supportedValueTypes":[ "STATIC_VALUE" ] }

optionsURLに送信されるペイロードは、次の形式になります。

// { "origin": { // The customer's portal ID "portalId": 1, // Your custom action definition ID "actionDefinitionId": 2, // Your custom action definition version "actionDefinitionVersion": 3 }, // The workflow object type the action is being used in "objectTypeId" : "0-1" // The input field you are fetching options for "inputFieldName": "optionsInput", // The values for the fields that have already been filled out by the workflow user "inputFields": { "widgetName": { "type": "OBJECT_PROPERTY", "propertyName": "widget_name" }, "widgetColor": { "type": "STATIC_VALUE", "value": "blue" } }, "fetchOptions": { // The search query provided by the user. This should be used to filter the returned // options. This will only be included if the previous option fetch returned // `searchable: true` and the user has entered a search query. "q": "option label", // The pagination cursor. This will be the same pagination cursor that was returned by // the previous option fetch; it can be used to keep track of which options have already // been fetched. "after": "1234=" } }

想定されるレスポンスは、次の形式になります。 

// { "options": [ { "label": "Big Widget", "description": "Big Widget", "value": "10" }, { "label": "Small Widget", "description": "Small Widget", "value": "1" } ], // Optional. The pagination cursor. If this is provided, the Workflows app will render // a button to load more results at the bottom of the list of options when a user is // selecting an option, and when the next page is loaded this value will be included in // the request payload under `fetchOptions.after`. "after": "1234=", // Optional. Default is false. If this is true, the Workflows app will render a search // field to allow a user to filter the available options by a search query, and when // a search query is entered by the user, options will be re-fetched with that search // term in the request payload under `fetchOptions.q`. "searchable": true }

上記のコードでは、ページネーションを設定して、返されるオプションの数を制限していることにご注意ください。この設定により、ワークフローに対し、さらに多くのオプションを読み込み可能であることを伝えます。

さらに、searchable:trueを含めてオプションのリストを検索可能にしています。

外部データの修正

外部データを管理するには、フィールド オプション フェッチのライフサイクルをカスタマイズするための2つのフックを組み込むことができます。

  • PRE_FETCH_OPTIONSHubSpotから送信されるペイロードを構成するための関数。
  • POST_FETCH_OPTIONS貴社のサービスから返されるレスポンスを、HubSpotで理解できる形式に変換するための関数。


PRE_FETCH_OPTIONS

この関数を組み込むと、各入力フィールドに適用されます。関数の定義でその入力フィールドのidを指定することで、特定の入力フィールドにこの関数を適用できます。

// { "functionType":"PRE_FETCH_OPTIONS", "functionSource":"...", id: "inputField" }

HubSpotから送信されるペイロードは、次の形式になります。

// { "origin": { // The customer's portal ID "portalId": 1, // Your custom action definition ID "actionDefinitionId": 2, // Your custom action definition version "actionDefinitionVersion": 3 }, // The input field you are fetching options for "inputFieldName": "optionsInput", // Your configured external data field webhook URL "webhookUrl": "https://myapi.com/hubspot/widget-sizes", // The values for the fields that have already been filled out by the workflow user "inputFields": { "widgetName": { "type": "OBJECT_PROPERTY", "propertyName": "widget_name" }, "widgetColor": { "type": "STATIC_VALUE", "value": "blue" }, "fetchOptions": { // The search query provided by the user. This should be used to filter the returned // options. This will only be included if the previous option fetch returned // `searchable: true` and the user has entered a search query. "q": "option label", // The pagination cursor. This will be the same pagination cursor that was returned by // the previous option fetch; it can be used to keep track of which options have already // been fetched. "after": "1234=" } } }

この場合、レスポンスは次の形式になります。

// { // The webhook URL for HubSpot to call "webhookUrl": "https://myapi.com/hubspot", // Optional. The request body. "body": "{\"widgetName\": \"My new widget\", \"widgetColor\": \"blue\"}", // Optional. A map of custom request headers to add. "httpHeaders": { "My-Custom-Header": "header value" }, // Optional. The Content-Type of the request. Default is application/json. "contentType": "application/json", // Optional. The Accept type of the request. Default is application/json. "accept": "application/json", // Optional. The HTTP method with which to make the request. // Valid values are GET, POST, PUT, PATCH, and DELETE. // Default is POST. "httpMethod": "POST" }

POST_FETCH_OPTIONS

外部データフィールドに従って想定される形式にレスポンスを解析するには、POST_FETCH_OPTIONS関数を使用します。POST_FETCH_OPTIONS関数の定義は、PRE_FETCH_OPTIONS関数と同じです。外部データのフェッチオプションが定義されている場合、アクションの入力オプションにドロップダウンメニューがレンダリングされます。 

// { "functionType":"POST_FETCH_OPTIONS", "functionSource":"...", id: "inputField" }

関数への入力は、次の形式になります。

// { // The requested field key "fieldKey": "widgetSize", // The webhook response body from your service "responseBody": "{\"widgetSizes\": [10, 1]}" }

関数からの出力は、次の形式になります。

// { "options": [ { "label": "Big Widget", "description": "Big Widget", "value": "10" }, { "label": "Small Widget", "description": "Small Widget", "value": "1" } ] }

出力フィールド

カスタムアクションによって値を出力し、その値を他のアクションで使用するには、出力フィールドを使用します。出力フィールドの定義は、入力フィールドの定義と同様です。 

  • name:カスタムアクションの他の部分でこのフィールドを参照する方法。UIに表示されるラベルは、カスタムアクションの「labels」セクションを使用して定義する必要があります。 
  • type:入力に必要な値の型。
  • fieldType:入力フィールドをUIでレンダリングする方法。入力フィールドは、CRMプロパティーと同様にレンダリングされます。有効なtypefieldTypeの組み合わせについて詳細をご確認ください。

出力フィールドは、次の形式になります。 

// { "outputFields":[ { "typeDefinition":{ "name":"myOutput", "type":"string", "fieldType":"text" } } ] }

出力フィールドを使用する場合、その値はactionURLから返されるレスポンスから解析されます。例えば、出力フィールドをHubSpotの既存のプロパティーにコピーできます。  

ラベル

ワークフローエディターで、ラベルを使用して出力や入力にテキストを追加できます。ラベルはHubSpotの言語サービスに読み込まれるため、表示されるまでに数分かかる場合があります。異なる地域や言語に設定されたポータルサイトでは、対応する言語のラベルがあれば、そのラベルが表示されます。 

  • labelsアクションのフィールドが表す内容とそのアクションの動作を説明する記述。英語のラベルは必須ですが、次のどの対応言語のラベルも併せて指定できます:フランス語(fr)、ドイツ語(de)、日本語(ja)、スペイン語(es)、ブラジルポルトガル語(pt-br)、オランダ語(nl))のラベルを指定することもできます。
  • actionNameワークフローエディターの[アクションを選択]パネルに表示するアクションの名前。
  • actionDescriptionユーザーがカスタムアクションを設定する際に表示されるアクションの詳細な説明。
  • actionCardContentアクションのカードに表示する説明の要約。
  • appDisplayNameアプリの全てのアクションが表示される、[アクションを選択]パネルのセクションの名前。複数のアクションでappDisplayNameが定義されている場合、最初に見つかった名前が使用されます。  
  • inputFieldLabels「inputFields」の定義を、該当する(ユーザーがアクションを設定する際に表示される)ラベルと結び付けるオブジェクト。
  • outputFieldLabels「outputFields」の定義を該当する(ワークフローツールに表示される)ラベルと結び付けるオブジェクト。
  • inputFieldDescriptions「inputFields」の定義を、該当するラベルの下に表示される説明と結び付けるオブジェクト。
  • executionRules「executionRules」の定義を、ワークフロー履歴のアクション実行結果に表示されるメッセージと結び付けるオブジェクト。これらのドキュメントには、実行ルールに関する別個のセクションがあります。 

ラベルの定義は、次の形式になります。

// { "labels":{ "en":{ "actionName":"Create Widget", "actionDescription":"This action will create a new widget in our system. So cool!", "actionCardContent":"Create widget {{widgetName}}", "appDisplayName":"My App Display Name", "inputFieldLabels":{ "widgetName":"Widget Name", "widgetOwner":"Widget Owner" }, "outputFieldLabels":{ "outputOne":"First Output" }, "inputFieldDescriptions":{ "widgetName":"Enter the full widget name. I support <a href=\"https://hubspot.com\">links</a> too." }, "executionRules":{ "alreadyExists":"The widget with name {{ widgetName }} already exists" } } } }

実行

アクションが実行されると、actionUrlにHTTPSリクエストが送信されます。

  • callbackIdこの特定の実行に固有のID。カスタムアクションの実行がブロックされている場合は、このIDを使用します。 
  • objectobjectRequestOptionsで要求されているプロパティーの値。
  • InputFieldsユーザーが入力フィールドに入力した値。 

実行ペイロードは、次の形式になります。 

// { "callbackId": "ap-102670506-56776413549-7-0", "origin": { "portalId": 102670506, "actionDefinitionId": 10646377, "actionDefinitionVersion": 1 }, "context": { "source": "WORKFLOWS", "workflowId": 192814114 }, "object": { "objectId": 904, "properties": { "email": "ajenkenbb@gnu.org" }, "objectType": "CONTACT" }, "inputFields": { "staticInput": "My Static Input", "objectInput": "995", "optionsInput": "1" } }

想定されるレスポンスは、次の形式になります。 

// { "outputFields":{ "myOutput":"Some value", "hs_execution_state": "SUCCESS" } }

実行レスポンスには、以下の要素があります。 

  • outputFields前に定義した出力フィールドの値。これらの値は、以降のアクションで使用できます。 
  • hs_execution_state出力フィールドに任意で追加できる特殊な値。再試行を指定することができない場合、追加できるのは次の値に限られます。
    • SUCCESS
    • FAIL_CONTINUE
    • BLOCK
    • ASYNC

SUCCESSFAIL_CONTINUEは、アクションが完了し、ワークフローで次のアクションが実行されることを意味します。実行状態が指定されていない場合は、ステータスコードを基にアクションの結果が判断されます。 

  • 2xxステータスコード:アクションが正常に完了したことを意味します。
  • 4xxステータスコード:アクションが失敗したことを意味します。例外的に429 Rate Limited(データレート制限)ステータスコードは再試行として再処理され、Retry-Afterヘッダーが考慮されます。
  • 5xxステータスコード:サービスに一時的な問題があったことを意味します。この場合、アクションは後で再試行されます。再試行はエクスポネンシャルバックオフ方式で行われます。再試行を継続できるのは最大3日間で、その期限に達すると失敗します。 

実行関数

実行関数を使用して、actionURLへの送信前にデータを書式設定したり、actionURLから返されたデータを解析したりできます。実行関数には次の2種類があります。

  • PRE_ACTION_EXECUTION
  • POST_ACTION_EXECUTION

PRE_ACTION_EXECUTION関数

actionURLへの送信前にデータを書式設定するには、PRE_ACTION_EXECUTION関数を使用します。

関数の定義は、次の形式になります。

// { "functionType":"PRE_ACTION_EXECUTION", "functionSource":"..." }

関数への入力は、次の形式になります。

// { "webhookUrl": "https://actionurl.com/", "callbackId": "ap-102670506-56776413549-7-0", "origin": { "portalId": 102670506, "actionDefinitionId": 10646377, "actionDefinitionVersion": 1 }, "context": { "source": "WORKFLOWS", "workflowId": 192814114 }, "object": { "objectId": 904, "properties": { "email": "ajenkenbb@gnu.org" }, "objectType": "CONTACT" }, "inputFields": { "staticInput": "My Static Input", "objectInput": "995", "optionsInput": "1" } }

関数からの出力は、次の形式になります。

// { // The webhook URL for HubSpot to call "webhookUrl": "https://myapi.com/hubspot", // Optional. The request body. "body": "{\"widgetName\": \"My new widget\", \"widgetColor\": \"blue\"}", // Optional. A map of custom request headers to add. "httpHeaders": { "My-Custom-Header": "header value" }, // Optional. The Content-Type of the request. Default is application/json. "contentType": "application/json", // Optional. The Accept type of the request. Default is application/json. "accept": "application/json", // Optional. The HTTP method with which to make the request. // Valid values are GET, POST, PUT, PATCH, and DELETE. // Default is POST. "httpMethod": "POST" }

POST_ACTION_EXECUTION関数 

actionURLからレスポンスを受け取った後、HubSpot用のデータに書式設定するには、POST_ACTION_EXECUTION関数を使用します。

関数の定義は、次の形式になります。

// { "functionType":"POST_ACTION_EXECUTION", "functionSource":"..." }

関数への入力は、次の形式になります。

// { "responseBody": "{\r\n \"returnValue\":\"Hello World!\"\r\n}" }

The function output should be formatted as follows:

// { "outputFields":{ "myOutput":"Some value", "hs_execution_state": "SUCCESS" } }

非同期実行

カスタム ワークフロー アクションを非同期で実行するには、アクションをいったんブロックし、後でそのアクションを完了します。

アクション実行のブロック

カスタムアクションを使用して、ワークフローの実行をブロックすることができます。貴社のサービスからのcompleted (2xx or 4xx status code)のレスポンスを受信した後、ワークフロー内のカスタムアクションの次のアクションは実行されず、貴社から続行の指示があるまでの間、その登録の実行が停止(ブロック)されます。

ブロックするときに、hs_default_expirationフィールドの値を指定することもできます。このフィールドに指定された時間が経過すると、カスタムアクションは有効期限切れと判断されます。その場合、アクションが完了していなくても、ワークフローの実行が再開され、カスタムアクションの後続のアクションが実行されます。 

カスタムアクションをブロックするには、アクション実行レスポンスを次の形式にする必要があります。

// { "outputFields": { // Required. Must be BLOCK for your custom action to block execution. "hs_execution_state": "BLOCK", // Optional. If not provided, a default expiration of 1 week is used. // Must be specified in ISO 8601 Duration format. // See https://en.wikipedia.org/wiki/ISO_8601#Durations "hs_expiration_duration": "P1WT1H" } }

ブロックされた実行の完了

ブロックされたカスタムアクションの実行を完了するには、エンドポイント/callbacks/{callbackId}/completeを使用します。

リクエスト本文は次の形式にしてください。

// { "outputFields": { // Required. The final execution state. Valid values are SUCCESS // (to indicate that your custom action completed successfully) or // FAIL_CONTINUE (to indicate that there was a problem with your // custom action execution) "hs_execution_state": "SUCCESS" } }

ルールによるカスタム実行メッセージの追加

アクションについて、アクションが実行された時点でワークフローの履歴ページにどのメッセージを表示するかを決めるルールを指定します。

ルールはアクションによる出力値と照合されます。この出力値は、actionURLのレスポンス本文内に次の形式で指定します。

// { "outputFields": { "errorCode": "ALREADY_EXISTS", "widgetName": "Test widget" } }

実際のメッセージは、カスタムアクションのlabelsセクションで指定することができます。

// { "labels": { "executionRules": { "alreadyExists": "The widget with name {{ widgetName }} already exists", "widgetWrongSize": "Wrong widget size", "widgetInvalidSize": "Invalid widget size" } } } }

executionRulesは、指定されている順序で分析されます。複数のルールが一致する場合、最初に一致したルールのメッセージのみがユーザーに表示されます。

ルールの一致は、実行による出力がルールに含まれる特定の値と一致すると発生します。例えば、次のようなexecutionRulesの組み合わせが考えられます。

// [ { // This matches the key of a label on the action's `labels.LANGUAGE.executionRules` map "labelName": "alreadyExists", "conditions": { "errorCode": "ALREADY_EXISTS" } }, { "labelName": "widgetWrongSize", "conditions": { "errorCode": "WIDGET_SIZE", "sizeError": ["TOO_SMALL", "TOO_BIG"] } }, { "labelName": "widgetInvalidSize", "conditions": { "errorCode": "WIDGET_SIZE" } } ]

上記のルールでは、次のように一致します。

  • {"errorCode": "ALREADY_EXISTS", "widgetName": "Test widget"}errorCodeALREADY_EXISTSと等しいため、最初のルールと一致します。この例では、widgetNameが出力されるとしても、ルール定義でその出力値は使用されていないため、どの値も許容されます。
  • {"errorCode": "WIDGET_SIZE", "sizeError": "TOO_SMALL"}TOO_SMALLsizeErrorのうちの1つと一致し、errorCodeWIDGET_SIZEであるため、2番目のルールに一致します。
  • {"errorCode": "WIDGET_SIZE", "sizeError": "NOT_A_NUMBER"}errorCodeWIDGET_SIZEですが、sizeErrorが2番目のルールで指定されている値(TOO_SMALLまたはTOO_BIG)のいずれにも一致しないため、3番目のルールと一致します。

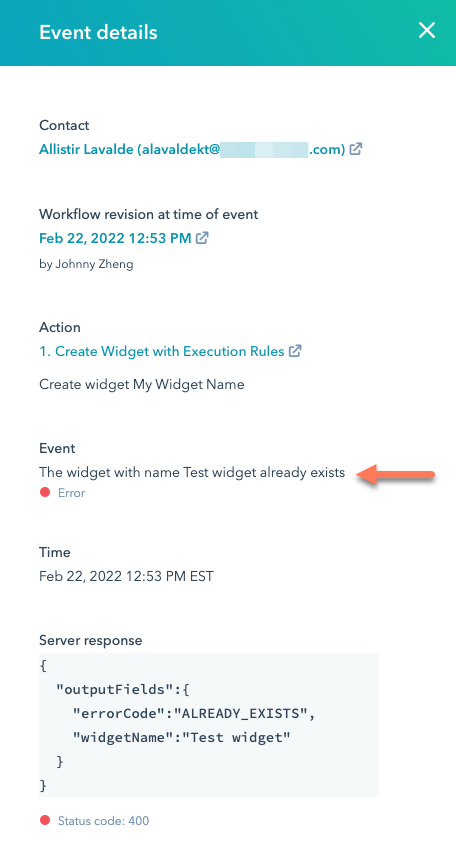
この一致の仕組みによってフォールバックエラー(エラー時の代替処理)を指定できます。重要なエラーの場合は特定のエラーメッセージを表示し、あまり発生しないエラーについては汎用的な代替エラーメッセージを表示できます。以下に、カスタムメッセージの表示例を示します。

カスタムアクションのテストと公開

新しいカスタムアクションを作成したら、テストして公開することができます。 

公開前のカスタムアクションのテスト 

カスタムアクションを公開する前に、URLをwebhook.siteに指定して、アクションの実行とフェッチオプションをテストすることができます。これにより、ペイロードを検査して、特定のレスポンスを返すことができます。 

開発者ポータルでアクションをテストすることもできます。それにはまず、ワークフローツールでワークフローを作成します。次に、新しいアクションを追加します。

テストを完了したら、テストアクションをアーカイブすることをお勧めします。アクションをアーカイブする方法について詳しくは、[エンドポイント]タブのカスタムアクションのアーカイブに関するセクションをご確認ください。

カスタムアクションの公開 

既定では、カスタムアクションは未公開の状態で作成されます。未公開のカスタムアクションは、対応するHubSpotアプリケーションに関連付けられている開発者ポータルにのみ表示されます。カスタムアクションをユーザーに対して表示するには、アクション定義のpublishedフラグを更新してtrueにします。アクションが未公開の場合でも、そのアクションをすでにワークフローに追加しているポータルでは、追加済みのアクションを編集して実行できます。ただし、そのアクションを再度追加することはできません。 

Example 1

A basic example with the following input fields, created for contact and deal workflows:

  • a static input field
  • a dropdown field with options
  • a field whose value is a HubSpot owner
  • a field whose value is pulled from a property (that the user creating the workflow selects) on the enrolled object.
// { "actionUrl": "https://example.com/hubspot", "inputFields": [ { "typeDefinition": { "name": "widgetName", "type": "string", "fieldType": "text" }, "supportedValueTypes": ["STATIC_VALUE"], "isRequired": true }, { "typeDefinition": { "name": "widgetColor", "type": "enumeration", "fieldType": "select", "options": [ { "value": "red", "label": "Red" }, { "value": "blue", "label": "Blue" }, { "value": "green", "label": "Green" } ] }, "supportedValueTypes": ["STATIC_VALUE"] }, { "typeDefinition": { "name": "widgetOwner", "type": "enumeration", "referencedObjectType": "OWNER" }, "supportedValueTypes": ["STATIC_VALUE"] }, { "typeDefinition": { "name": "widgetQuantity", "type": "number" }, "supportedValueTypes": ["OBJECT_PROPERTY"] } ], "labels": { "en": { "actionName": "Create Widget - Example 1", "actionDescription": "This action will create a new widget in our system. So cool!", "actionCardContent": "Create widget {{widgetName}}", "inputFieldLabels": { "widgetName": "Widget Name", "widgetColor": "Widget Color", "widgetOwner": "Widget Owner", "widgetQuantity": "Widget Quantity" }, "inputFieldDescriptions": { "widgetName": "Enter the full widget name. I support <a href=\"https://hubspot.com\">links</a> too.", "widgetColor": "This is the color that will be used to paint the widget." } } }, "objectTypes": ["CONTACT", "DEAL"] }

例2

次のカスタムアクションでは、サーバーレス関数を使用して、構成済みの「actionUrl」に送信されるペイロードを変換しています。「objectTypesが指定されていないため、このアクションは全てのワークフロータイプで使用できます。

// { "actionUrl": "https://api.example.com/v1/widgets", "inputFields": [ { "typeDefinition": { "name": "widgetName", "type": "string", "fieldType": "text" }, "supportedValueTypes": ["STATIC_VALUE"], "isRequired": true } ], "labels": { "en": { "actionName": "Create Widget - Example 2", "actionCardContent": "Create widget {{widgetName}}", "inputFieldLabels": { "widgetName": "Widget Name" } } }, "functions": [ { "functionType": "PRE_ACTION_EXECUTION", "functionSource": "exports.main = function(event, callback) { return callback(transformRequest(event)); }\nfunction transformRequest(request) { return { webhookUrl: request.webhookUrl, body: JSON.stringify(request.fields), contentType: 'application/x-www-form-urlencoded', accept: 'application/json', httpMethod: 'POST' }; }" } ] }

例3

次のカスタムアクションには、フィールド依存関係と、APIから取得したオプションがあります。ウィジェットサイズはウィジェットの色に依存するため、ウィジェットの色が選択されるまで、ユーザーはウィジェットサイズの値を入力できません。

ウィジェットコストもウィジェットの色に依存しますが、ユーザーがウィジェットの色に選択する値に基づく条件が設定されています。ここでは、ウィジェットの色として「赤」が選択されない限り、ウィジェットコストの値を入力できません。

// { "actionUrl": "https://example.com/hubspot", "inputFields": [ { "typeDefinition": { "name": "widgetName", "type": "string", "fieldType": "text" }, "supportedValueTypes": ["STATIC_VALUE"], "isRequired": true }, { "typeDefinition": { "name": "widgetColor", "type": "enumeration", "fieldType": "select", "options": [ { "value": "red", "description": "red", "label": "Red" }, { "value": "blue", "description": "blue", "label": "Blue" }, { "value": "green", "description": "green", "label": "Green" } ] }, "supportedValueTypes": ["STATIC_VALUE"], }, { "typeDefinition": { "name": "widgetSize", "type": "enumeration", "fieldType": "select", "optionsUrl": "https://api.example.com/v1/widget-sizes" }, "supportedValueTypes": ["STATIC_VALUE"] }, { "typeDefinition": { "name": "widgetCost", "type": "number", "fieldType": "number" }, "supportedValueTypes": ["OBJECT_PROPERTY"] } ], "inputFieldDependencies": [ { "dependencyType": "SINGLE_FIELD", "controllingFieldName": "widgetColor", "dependentFieldNames": ["widgetSize"] }, { "dependencyType": "CONDITIONAL_SINGLE_FIELD", "controllingFieldName": "widgetColor", "controllingFieldValue": "red", "dependentFieldNames": ["widgetCost"] } ], "labels": { "en": { "actionName": "Create Widget - Example 3", "actionCardContent": "Create widget {{widgetName}}", "inputFieldLabels": { "widgetName": "Widget Name", "widgetColor": "Widget Color", "widgetSize": "Widget Size", "widgetCost": "Widget Cost" } } }, "objectTypes": ["CONTACT", "DEAL"], "functions": [ { "functionType": "PRE_FETCH_OPTIONS", "id": "widgetSize", "functionSource": "exports.main = function(event, callback) { return callback(transformRequest(event)); }\nfunction transformRequest(request) { return { webhookUrl: request.webhookUrl + '?color=' + request.fields.widgetColor.value, body: JSON.stringify(request.fields), httpMethod: 'GET' }; }" } ] }

例4

次の例では、カスタムアクションをブロックしています。コールバックAPIはHubSpotに対し、アクションを完了して登録済みオブジェクトをワークフローの次のアクションに進ませるよう指示する際に使用します。

アクションの作成時にアクションのブロックを指定する必要はありません。貴社が設定したactionUrlからのレスポンスによって決まるからです。

// { "actionUrl": "https://example.com/hubspot", "inputFields": [ { "typeDefinition": { "name": "moonPhase", "type": "enumeration", "fieldType": "select", "options": [ { "value": "full_moon", "description": "Full Moon", "label": "Full" }, { "value": "half_moon", "description": "Half Moon", "label": "Half" }, { "value": "quarter_moon", "description": "Quarter Moon", "label": "Quarter" }, { "value": "new_moon", "description": "New Moon", "label": "New" } ] }, "supportedValueTypes": ["STATIC_VALUE"] } ], "objectRequestOptions": { "properties": ["email"] }, "labels": { "en": { "actionName": "Wait For Moon Phase", "actionCardContent": "Wait until a {{moonPhase}} moon", "inputFieldLabels": { "widgetName": "Moon Phase" } }, "fr": { "actionName": "Attendez la phase lunaire", "actionCardContent": "Attendez la lune {{moonPhase}}", "inputFieldLabels": { "widgetName": "Phase de lune" } } }, "objectTypes": ["CONTACT"] }

参考になりましたか?
こちらのフォームではドキュメントに関するご意見をご提供ください。HubSpotがご提供しているヘルプはこちらでご確認ください。